
Happy Easter everyone!
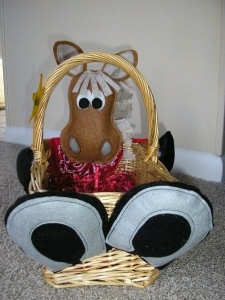
Here is a tutorial to make this super cute Easter basket!
Click here for the pattern!
1. Cut out pattern pieces as noted. Seam allowance, except for * ear bottom is ¼ inch. You are stitching from top (wrong sides together) –not turning anything- except when you attach hoof piece to arms.
2. Ears-
a. Lay inside of ear on a piece of body colored felt at least ½ inch larger around than inside ear piece.
b. Stitch 1/8 inch all around inside ear piece.
c. Trim the back of each ear ¼ inch from inside ear piece. See ear detail.
d. Pleat the bottom of each ear to fit within ear placement line and stitch across on the *seam line to hold- set aside.
3. On head piece-
a. Cut out eyes and machine appliqué in place.
b. Place a contrasting strip of felt (4 ½”x 2 1/4”)under the nose holes. Zig zag around nose holes. With black thread outline the nostrils by straight stitching 1/8 “ around each nostril. On back, trim felt strip close to stitching.
c. When all the facial features are done stitch the ears on where indicated on pattern.
d. Forelock- cut a piece of felt 2 x 2 1/4” . Sew one 2” end across the top of head curve. Fringe forelock using ¼” vertical cuts up to within ¼’ of stitching.
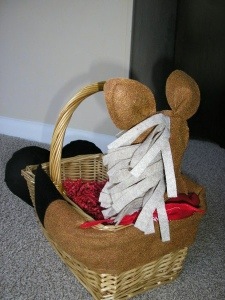
e. For mane- on the back head, center a piece of mane felt 6 inches wide by 4 1/2 inches long. When placing mane avoid for 1/4” seam allowance at top of head. Stitch on mane piece down center back. Fringe mane making ¼” horizontal cuts.
Push both sides of mane to one side and stitch again 1/8” from center seam to hold to side.
f. Match up the two head pieces face/head wrong sides together and stitch ¼’ starting on one side of the chin sew around the head/face stopping at the other side. Be careful not to catch mane in stitching. Be sure and catch the ears, though 😉
g. Stuff lightly. Insert a small paint stirrer up into head to support it in chin opening, glue closed around stir stick.
4. Arms- Cut out of horse body felt a rectangle 6” x 14”. For arm hooves- Cut out of black felt 2 rectangles 6” x 3 ¼”.Match a black hoof rectangle to each 6” end of the arm rectangle. stitch on hoof section to each arm end using a ¼” seam allowance.
These are the only seams in the whole project that are to the inside. Fold the arm/hoof piece in half lengthwise wrong sides together. Trim the raw edge of the hoof on each end to a slight curve (see arm detail diagram on pattern)- and stitch together (1/4”from edge) all around leaving about 3’ open in the center back for stuffing.
Stuff each hoof end and about 2” up into arm section. Stitch the opening closed.
5. Bottom Hooves- Cut out 2 horseshoes and 2 hooves- Lay a horseshoe on top of each hoof and topstitch down close to edge. Then lay each horseshoe/hoof face up on a piece of felt and stitch all the way around entire unit as indicated on pattern. Trim back felt to match top for each hoof. Pull back away from front and cut a slit IN THE BACK ONLY
Stuff each foot lightly through this back slit.
6. Assemble. I use a glue gun. Glue arms on-Bottom 1/3 of arms, about 4 inches in center back along ridge of basket. Hands/hooves glue on each side of basket ridge. Head on paint stick, glue paint stick on from the inside in center back with it slightly supported by the ridge of the basket. Glue feet/hooves as pictured to the front of the basket (the slit you cut to stuff them will not show when they are glued in place).
7. I used the other half of the bandana I made the baby bib out of for around the neck of the horse. You could always use a silk flower candle ring for the neck of a girl horse (like she just won a Derby) or a pink bandana.
*special thanks to the Quilting Board
1 comment for “DIY Easter Horse Basket”